The course manager tool allows content management admins to manage, view, clone, and create courses at the portal level.
Accessing the course management tool:
- Go to the Settings section
- Go to the Portal Management module
- Choose the portal
- Click on the "Courses" option listed on the left-hand menu beneath the "CONTENT" section
Managing Existing Courses
On the main page of the course manager tool, you can view all courses available for the portal in the table listing. As with all content, there are two main types of courses: system courses (the pre-existing courses in the Engagement Rx system) and custom courses (courses created by the client).
The action menu allows slightly different actions for system and for custom courses:
- System courses can be cloned (and then edited and saved as a custom course), and set to either enabled or disabled for the portal.
- Custom courses can be edited, cloned, deleted, and set to either enabled or disabled for the portal.
Creating a New Course
Custom courses can be created and enabled for use in a portal. To create a course, start by clicking the “CREATE A NEW COURSE” button above the table.
Configure the Course Settings
Select the “Settings” option from the Start of Course tile on the course builder:

The General Settings editor is now open on the left half of the screen:

- Enter the title for the course that the user will see
- Enter the title that appears for admin use (this title will appear in the course manager table)
- Enter keywords associated with the course
- Add the thumbnail image that will represent the course in the user’s homepage (accepted files are .png and .jpg, with size of 300 x 200)
- Add a short summary that outlines the purpose of the course
Build the Course
Courses are built by sequencing lessons which are made up of flow components. To begin building the course, select the "Add lesson" button in the building field (the right side of the screen):

Now you can click inside the lesson tile in the course builder and enter the lesson title and a summary for the lesson:

- Click in the lesson tile
- Fill in a title for the lesson that the user will see
- Fill in a short summary of the lesson’s content and/or objective
Create the Lesson Using the Available Components
Lessons are made up of one or more components; only components that are enabled for the portal will be available as options (learn about the flow manager).
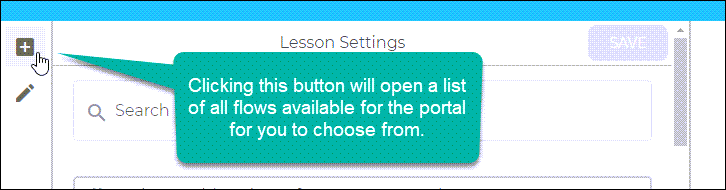
Too add a component, click the plus icon on the top-left of the editor (left half of screen):
Continue building out the lesson with all components you want to include, sequenced as you would like. When you've finished creating the first lesson, you can add another lesson by selecting "Add lesson" and repeating the process.
Was this article helpful?
That’s Great!
Thank you for your feedback
Sorry! We couldn't be helpful
Thank you for your feedback
Feedback sent
We appreciate your effort and will try to fix the article